
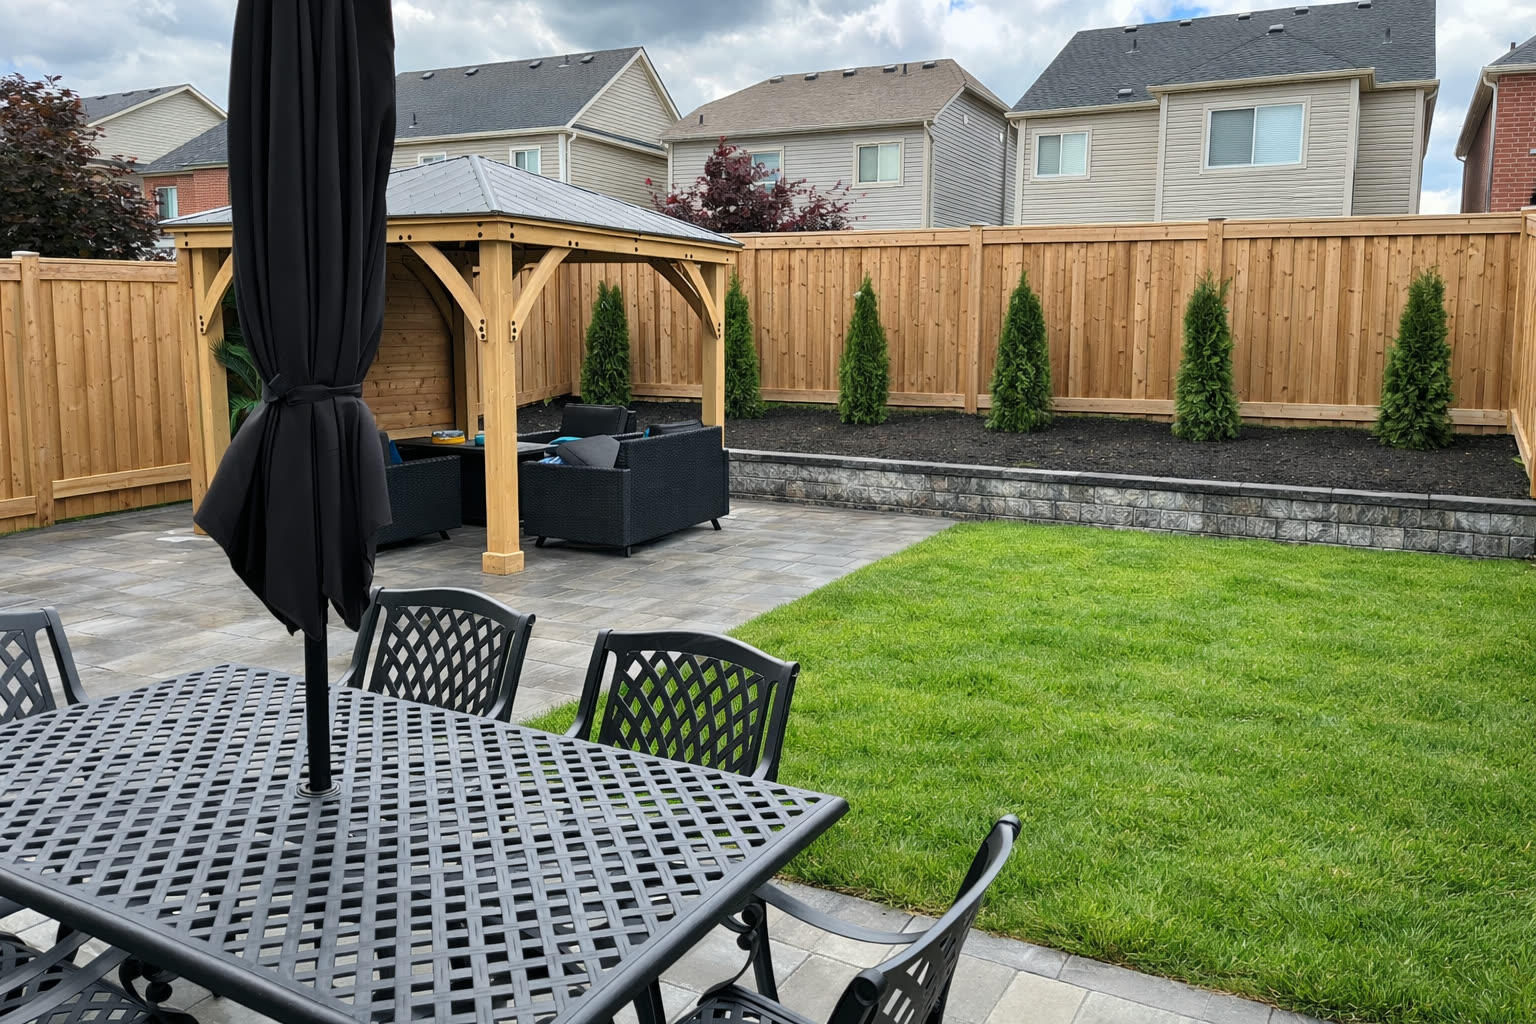
Planning an outdoor living space in Innisfil starts with a site assessment — soils near Lake Simcoe range from sandy loam to heavy clay, which changes base depth from 14 to 16+ inches. A 600 sq ft patio-and-deck combo typically runs $35,000–$65,000 installed. Most projects take 10–15 weeks from first consultation to final walkthrough. Phasing the build across two seasons is a real option — if you excavate the full footprint in Year 1.
Innisfil sits at an interesting intersection: close enough to Lake Simcoe that moisture and frost cycles are more aggressive than inland Barrie, yet suburban enough that most lots are flat, tight, and hemmed in by neighbours. Both factors shape how we approach outdoor living projects here — from the excavation depth we specify to the privacy solutions we recommend at the property line.
A lot of clients come to us after a disappointing experience with a contractor who treated the yard like it was in Mississauga: minimal base, standard polymeric sand, done in three days. The problem is that freeze-thaw in Simcoe County is relentless — soil heaves, joints crack, and sand washes out faster than it should. Getting the planning right at the start is the difference between a surface that lasts 25 years and one that needs a full reset in five.
This guide walks through the 7 steps we follow on every outdoor living project in our Innisfil service area — from the first site walk to the final permit sign-off. Whether you are planning a combined patio, pergola, and composite deck, or just an interlocking pad with seating, the process is the same. The order matters.
Step 1 — Site Assessment: What We Look for Before Any Design Work Starts
The first visit to an Innisfil property is less about ideas and more about information. We are looking at four things: drainage direction, soil type, sun exposure, and where the utilities are buried. Every one of these affects the design before a single paver gets drawn on a plan.
Innisfil soils vary more than most people expect. Properties closer to the lakeshore often have sandy, well-draining loam — ideal for base compaction. Move a few kilometres inland toward Alcona or Stroud, and you are into heavier clay that holds water through spring and softens in wet summers. Clay soil is workable, but it changes the base depth calculation. Where we might excavate 14 inches on a sandy lot, we go to 16 inches or deeper on clay to account for frost movement.
Drainage direction is where most planning errors happen. We see a lot of yards that slope toward the foundation — often because the original grading was fine until someone added a deck, a pool, or a raised patio that disrupted the natural runoff path. Before we design anything, we map where water goes during a heavy rain. If it pools or runs toward the house, that is a grading problem that needs solving before any paving goes in, not after.
Sun exposure matters for material choice. South-facing patios in Innisfil get full summer sun from mid-morning to evening, which can drive dark paver surface temperatures to 45–55°C. That is fine for a shaded dining zone but worth planning around near a pool where people walk barefoot for hours.
Utility locates through Ontario One Call are mandatory before any excavation. We file this as part of every site visit. If gas, electrical, or fibre runs through the planned patio zone, it reshapes the layout — not catastrophically, but it can add cost and redirect a feature. This first step typically takes 60–90 minutes on site.
Steps 2 & 3 — Zone Layout and Setting Build Priorities
Once the site is understood, we design zones. An outdoor living space is not a single surface — it is a collection of distinct use areas that need to connect logically. On a typical Innisfil property with a 30 x 40 ft rear yard, we are usually working with three to four zones: a dining area, a lounge or conversation zone, a cooking and prep area, and sometimes a lawn buffer or kids zone. How those zones connect — and what materials define each one — is the design.
Traffic flow is the variable most clients underestimate. The path from the back door to the BBQ to the dining table should feel natural without people squeezing past furniture or stepping off a paved surface onto grass. We design 4-foot clearance for main paths and 3-foot minimum for secondary routes. On tighter Innisfil lots, this constraint makes the design more disciplined and often better overall.
Zone transitions are where design gets interesting. A main interlocking patio in Techo-Bloc or Unilock at grade, a TimberTech composite deck at door threshold height, and a lower seat wall that defines the lounging zone can coexist in a single backyard — if the transitions between them are planned rather than improvised. The materials change but the transitions should feel intentional.
Step 3 — setting build priorities — happens alongside zone layout. Most clients have more ideas than budget. Ranking zones by how often they will actually be used helps cut the list to what belongs in Phase 1. A dining zone and direct connection to the back door get daily use. An elaborate fire pit feature might see 20 evenings per year. That does not mean skip it — it means phase it. Our project process page walks through how we sequence decisions to keep scope and cost aligned from the first consultation forward.
Step 4 — Choosing Surface Materials That Match Each Zone
Material selection for an outdoor living space in Innisfil comes down to use, aesthetics, and tolerance for heat and maintenance. We work with three paver lines — Permacon, Unilock, and Techo-Bloc — plus TimberTech composite decking for elevated surfaces and platforms. Each has a natural role in a well-designed outdoor space.
For main patios and paved areas, Techo-Bloc and Unilock offer the widest range of slip-resistant textures available in Ontario and both carry full manufacturer warranties when installed to spec. Permacon is a strong value option and widely available through Carr Landscape Depot in Barrie, which is where we source the majority of our paver material. All three brands perform well in Simcoe County freeze-thaw cycles when the base is done properly.
For elevated surfaces — decks attached to the house, raised platforms off a dining area — TimberTech composite decking is what we specify. It is dimensionally stable across Ontario temperature swings, requires no annual staining, and comes in colours that coordinate well with warm-toned pavers. The Dark Cocoa profile from the Prime Collection is the most requested finish on current Innisfil projects.
Seat walls and step risers are typically done in matching or complementary paver material, which ties the hardscape together visually. Natural stone caps — limestone or granite — are available for a custom look and add roughly $40–$65 per linear foot over a paver cap.
One local consideration: darker paver surfaces facing south or west get very hot in July and August. For pool decks, lighter colours or a brushed and tumbled texture diffuse surface heat significantly better than a smooth polished face. See our Innisfil landscape design page for current material samples and project photos from completed local installations.
Steps 5 & 6 — The Base Spec and Drainage Plan
This is the step that separates a 25-year outdoor living surface from one that starts settling and cracking within 5 years. Every interlocking installation we do uses 12 to 16 inches of compacted clear stone as the base — not granular A, which is the standard road base product most contractors default to. Clear stone is angular and self-draining; water passes through it rather than pooling near the frost line.
In Innisfil, where freeze-thaw cycles can exceed 100 events in a harsh winter, that drainage capacity is what keeps pavers level season after season. When water is trapped in a granular A base near the surface, it freezes, expands, and pushes stones up unevenly. With properly drained clear stone, there is no water column to freeze. This is one reason we can offer a 5-year structural warranty and actually stand behind it — the base engineering makes it achievable.
Drainage planning in Step 6 means deciding where water goes once it lands on the paved surface. For patios up to 600 sq ft, a 1% slope away from the house is often sufficient. Larger surfaces, low-lying areas, or anything adjacent to a pool typically need a catch basin and perforated drain line running to daylight or a municipal connection. The cost is real — $800–$2,500 depending on the run length — but the alternative is a wet zone that erodes the base from above over multiple seasons.
Downspout routing also gets reviewed at this stage. A single downspout can discharge more than 1,000 litres per hour in a heavy Innisfil summer storm. If that volume is emptying onto or near the patio base, we redirect it underground to an outlet 10–15 feet away before the first stone goes in.
Step 7 — Phasing the Build Without Compromising the Final Design
Phasing an outdoor living project is a strategy, not a shortcut. Done well, it means you get a functional, finished-looking outdoor space in Year 1 and complete remaining zones in Year 2 or Year 3 — without re-excavating, re-grading, or redoing any completed work.
The key is designing the full project first, then determining which phases split cleanly. A patio and pergola combination is a natural Phase 1 — complete and finished on its own. A composite deck attached to the house can follow in Phase 2 without disturbing the patio, as long as footing locations and deck post positions are planned and installed during Phase 1 construction.
What does not phase well is base work. Excavation and clear stone installation are most cost-efficient done in a single mobilisation. On a 1,200 sq ft project, excavating the full area in Year 1 runs $4,000–$6,000. Returning to excavate a second section — working around an established edge, remobilising equipment — typically adds $2,500–$3,500 to the total cost. The savings are not there, and the disruption to finished work is real.
Our recommendation: excavate and rough-grade the entire project footprint in Phase 1, even if the surface installation spans two seasons. The base is complete, drainage is addressed, and Phase 2 becomes a surface-only installation on a prepared platform.
Permits are also worth sequencing carefully. Building permits for decks 600mm (roughly 24 inches) or more above grade are required in Innisfil and Barrie. If a raised deck is planned for Phase 2, we submit the permit application during Phase 1 construction so it is approved and ready when build time comes. Use our cost estimator to model the difference between a single-phase and two-phase build before your first consultation.
Paver Brand Comparison: Permacon vs. Unilock vs. Techo-Bloc for Simcoe County Projects
| Brand | Best Use | Typical Installed Cost | Material Lead Time | Where We Source It |
|---|---|---|---|---|
| Permacon | Driveways, value-focused patios | $18–$26 per sq ft | 1–2 weeks | Carr Landscape Depot, Barrie |
| Unilock | Patios, pool decks, large-format slabs | $22–$35 per sq ft | 2–4 weeks | Carr Landscape Depot, Barrie |
| Techo-Bloc | Contemporary design, premium textures | $24–$38 per sq ft | 3–5 weeks | Carr Landscape Depot, Barrie |
Frequently Asked Questions
What is the minimum budget for an outdoor living space in Innisfil?
A basic interlocking patio with proper base prep starts around $15,000–$20,000 for a 300–400 sq ft surface. Add a pergola, seat wall, and composite deck and the realistic range for a mid-scope project is $40,000–$70,000. The base spec — 12 to 16 inches of clear stone — is non-negotiable and already built into those numbers.
Do I need a permit for a patio in Innisfil?
A ground-level interlocking patio generally does not require a permit in Innisfil or Barrie. A deck that is 600mm (roughly 24 inches) or more above grade requires a building permit and inspections. Fire pits may also require a permit depending on proximity to the house. We advise on permit requirements during the site assessment before any design work begins.
How long will interlocking pavers last in Simcoe County's climate?
Properly installed interlocking pavers — on a 12 to 16 inch clear stone base, with quality polymeric sand and good surface drainage — routinely last 25–30 years in Simcoe County's freeze-thaw climate. The base is where most premature failures start, not the paver material itself. We back our installations with a 5-year structural warranty.
Can we phase the project across two summers?
Yes, and it works well when planned in advance. The key is completing all excavation and base work in Year 1 — even for zones where the surface will not go in until Year 2. Returning to re-excavate around a finished area costs significantly more than doing the full footprint once. We design the complete project in Year 1 and split the surface installation deliberately.
What is the best time of year to start the planning process?
If you want a summer completion, start the conversation between October and February. That gives time for the site visit, 3D design, material selection, and permit applications before spring lead times on pavers start stacking up. Clients who call in May or June often end up with an August or September completion — still a great outcome, but with less scheduling flexibility.
Why do you use clear stone instead of granular A for the base?
Granular A is a mixed aggregate that retains water near the surface. In Simcoe County's freeze-thaw climate, that trapped water expands and heaves pavers over time. Clear stone is angular and self-draining — water passes through rather than pooling. It compacts firmly and keeps the base stable across 100+ freeze-thaw cycles per season. It costs a bit more than granular A, and it is why the structural warranty holds.
Do you work across Simcoe County beyond Innisfil?
Yes — we work throughout Simcoe County, including Barrie, Oro-Medonte, Springwater, Orillia, Wasaga Beach, Midland, and Collingwood. Innisfil is one of our core service areas given its proximity to our Barrie base and the volume of outdoor living projects we have completed near Lake Simcoe.

Yorkis Estevez founded the company in 2020 after years of hands-on landscaping work across Simcoe County. We hold WSIB coverage, $5M general liability insurance, and a 5.0 Google rating across dozens of completed projects in Barrie, Innisfil, and surrounding municipalities. Yorkis personally oversees site assessments, material selection, and quality control on every project we take on.
If you are planning an outdoor living space in Innisfil or anywhere across Simcoe County, the right first step is a site visit. We assess drainage, soil type, and sun exposure before any design work begins — no obligation, no pressure to commit. Use the cost estimator to rough out a budget range, then get in touch to book a time. We typically have Innisfil consultations available within 2 weeks.